

A strapless dress spec sheet example
Your factory needs to know where to measure, what number to aim for and how much variation you'll accept. This example from our Black Strapless Ruffled Dress tech pack shows how those details fit together. The sample size is S, and all measurements are in centimetres.
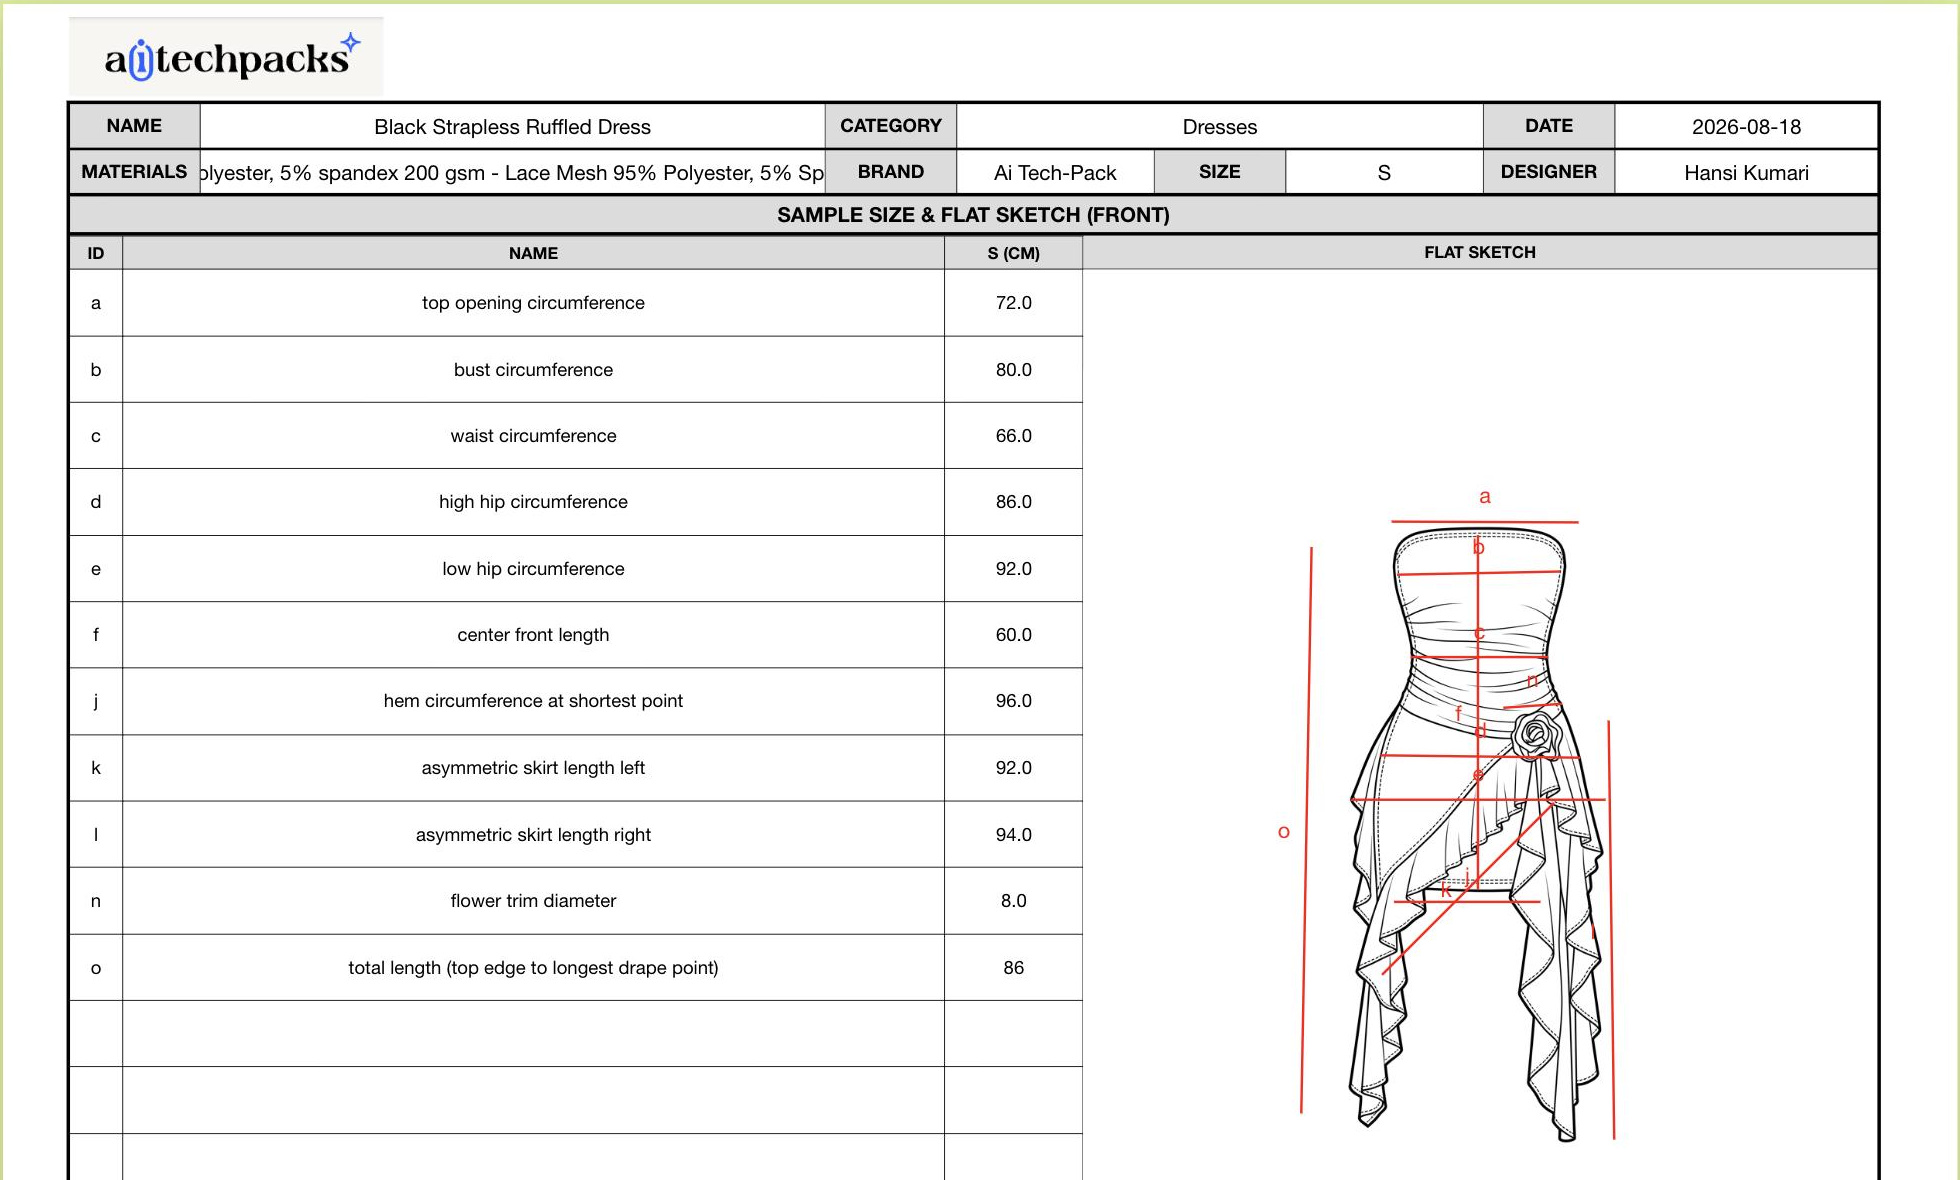
These measurements and tolerances come from pages 6 and 8 of the sample PDF, dated August 18, 2026. Use them as an example, then have your technical designer set and approve the measurements for your own style. The notes below cover what to agree with your factory before sampling.
| POM | Measurement | S (cm) | Tolerance (cm) | What to agree with your factory |
|---|---|---|---|---|
| a | Top opening circumference | 72.0 | ±0.5 | Measure the full opening. Agree with the factory whether the stretch fabric should be relaxed or extended. |
| b | Bust circumference | 80.0 | ±1.5 | Mark the bust level on the flat sketch, then measure the full garment circumference at that level. |
| c | Waist circumference | 66.0 | ±1.5 | Use the same waist level each time. This is the full circumference, not the width of the garment laid flat. |
| f | Center front length | 60.0 | ±1.0 | Mark where the center-front measurement starts and ends. The longest drape is a separate measurement. |
| n | Flower trim diameter | 8.0 | ±0.5 | Measure across the finished rosette. Agree how to arrange it so both teams measure it the same way. |
For this dress, the waist target is 66.0 cm with a tolerance of ±1.5 cm. A waist measurement between 64.5 and 67.5 cm falls within that tolerance. Tolerance is the allowed variation within one size; a grade rule sets the change between sizes. This pack covers size S. You'll need to set grade rules for the other sizes in your range.
The measurements should also agree with the rest of the tech pack. This dress has an invisible zipper at the center-back seam and an 8.0 cm rosette at the front right waist, with separate front and back construction callouts. Check fabric composition, stretch, consumption and trim details with your suppliers before signing off.
How to record a sample correction
Say your first sample comes back with a 68.0 cm waist. That's above the 67.5 cm limit. Keep the 66.0 cm target in the spec sheet and record the sample's 68.0 cm measurement separately, so the factory can see what needs correcting. Here's a hypothetical first-sample note using those numbers:
- Revision
- R01 · first-sample comments · POM c
- Target / measured
- 66.0 cm ±1.5 cm / 68.0 cm (outside tolerance)
- Next step
- Check the measuring method, fit and pattern with your technical designer, then ask for a corrected sample. Only change the target if the fit review calls for it.
- Revision details
- Add the date, reviewer, marked-up image and sample round. Measure the next sample and record the result before approving the correction.
When you start with an AI-generated tech pack, keep track of the specs your team supplied and check the suggestions the tool added. A garment photo can show the design, but it can't tell you the finished measurements. Your technical team still needs to review the draft before it goes to the factory.
Use our tech pack template to put your specs together. If your team is juggling several styles and sample rounds, our tech pack software comparison can help you choose how to manage them.
What is a Spec Sheet?
A spec sheet in fashion is a comprehensive document outlining all the technical specifications of a garment. It helps ensure the final product matches your original vision. As you manage details like fabric choices, measurements, stitching methods, and labeling, even a small miscommunication can derail production. A clear spec sheet prevents these issues by offering a single, definitive point of reference.
If this feels overwhelming for you, you can always hire and outsource this work to a technical designer who will design and make the tech pack for you.
Key Components of a Fashion Spec Sheet
A detailed spec sheet usually includes:
1. Technical Sketches
These flat sketches, usually rendered in black and white, depict the garment's front and back views. Occasionally, extra angles or close-ups are added to enhance clarity. These visual references reduce ambiguity, allowing manufacturers to understand how the final product should appear.
2. Measurement Table
Precise sizing information is crucial. List measurements for areas like bust, waist, hips, sleeve length, or inseam. Each measurement generally includes a tolerance—an acceptable range for minor production variations.
3. Fabric and Trim Details
Here, you specify the type of fabric (cotton, silk, polyester), its weight or texture, and color codes. You can also provide details on any prints or patterns. If trims or embellishments—like zippers or buttons—are used, list them along with their material and color.
4. Construction Details
This section outlines how the garment should be assembled: seam types, stitch lengths, closures, and any other instructions related to garment construction.
5. Labeling and Packaging Instructions
This ensures a consistent final presentation. Include everything from brand labels and care instructions to hang tags and folding requirements. Packaging details can greatly affect how customers perceive a brand, especially in luxury or high-end markets.
Why Spec Sheets Are Essential in Fashion Production
In fashion, precision is everything. Without a detailed spec sheet, manufacturers often have to guess how to interpret a design, which can lead to mistakes and wasted resources. A clear, thoroughly prepared spec sheet eliminates these uncertainties, making the entire process smoother and more efficient.
Communication
Designers, pattern makers, and production teams may be scattered across different locations, and the spec sheet acts as a universal language. When every detail is spelled out in one document, everyone involved knows exactly what is expected.
Reduce Errors
A garment that deviates even slightly from its intended measurements or materials can harm your brand’s reputation and cost you both time and money. A spec sheet outlines each critical detail in one place, lowering the risk of misinterpretation and the need for costly rework.
Streamline Production
With a clear set of instructions on file, manufacturers can work more quickly and confidently, cutting down on back-and-forth communication. By specifying stitch types, fabrics, and exact measurements up front, you’re ensuring a high degree of consistency from one production run to the next.
Quality Control
It acts as the definitive reference point for checking finished garments. If a product fails to meet the prescribed measurements or fabric details, the discrepancy can be easily identified and corrected. This level of precision helps keep product quality high and fosters customer trust in your brand.
How to Create an Effective Spec Sheet
Making a great spec sheet is as much about structure as it is about content. Every element should be clear, consistent, and easy for manufacturers or production teams to follow.
Here are the essential steps for creating a spec sheet that simplifies the production process while maintaining the designer’s vision.
AI Tech Packs helps you turn garment references and the specs you already have into an editable first draft. Check the measurements, materials and construction with your technical team before sampling.
1. Start with a Clear Template
Begin by establishing a consistent layout. Whether you use a simple spreadsheet or specialized design software, keep the format intuitive so anyone reading it can locate information without confusion. This typically involves sections for measurements, materials, and construction details, laid out in a logical sequence.
2. Detail Every Element of the Garment
Your spec sheet should cover all components that influence the garment’s look, fit, and feel. This includes the official name or style number, the fabrics to be used (with precise compositions and color references), and any trims or embellishments you plan to incorporate. Construction details—like seam finishes or specific stitching requirements—should also be spelled out.
You minimize the chances of ambiguity during production by leaving no detail overlooked. Think of it as providing a blueprint: The more comprehensive and explicit it is, the easier it is to build the finished piece accurately.
3. Use Visuals Effectively
While words describe the garment’s technical requirements, visuals clarify them. Including technical sketches from multiple angles ensures your creative vision is visually represented. Diagrams for measurement points can also illustrate exactly where to measure bust, waist, inseam, and other critical areas.
If you’re using specific fabrics or trims, providing swatches or reference images can further reduce confusion. Combined with concise written instructions, visuals create an all-encompassing guide that leaves little room for error.
4. Accurately Define Measurements
Inaccurate measurements are one of the most frequent sources of production errors. Clearly list every dimension that matters—from the garment’s total length and sleeve circumference to smaller details like pocket placement.
Specify tolerances (the acceptable range for minor production variations) to provide some flexibility without compromising quality.
5. Specify Construction Details
How a garment is sewn together can be just as important as its overall design. In this section, indicate the types of seams or stitches to use, outline any special hems or finishings, and clarify exactly how closures (zippers, buttons, hooks) should be attached. These details ensure your garment not only looks right but also holds up to wear and tear.
The more precise you are about seam allowances and construction methods, the less room there is for manufacturers to guess or choose alternatives that might diverge from your original intent.
6. Outline Labeling and Packaging Requirements
Labeling and packaging are sometimes overlooked, but they can be critical to a garment’s final presentation—especially for premium or luxury lines.
If you have specific requirements for brand labels, care instructions, hang tags, or how the garment should be folded and packaged, spell them out in this section. An engaging unboxing experience often adds value and can set you apart from competitors.
How AI Techpacks Simplifies Spec Sheet Creation
While spec sheets are indispensable, creating them manually can be tedious and error-prone. This is where tech pack software like AI Techpacks streamlines the process:
- Start with your design: Upload a garment reference and add the specs you already know. Check any generated suggestions against your design, fit requirements and supplier information before approving them.
- Error Reduction: Manual data entry is a common source of mistakes—typos in measurements, missed fabric details, or misplaced tolerances. AI Techpacks prompts you for essential information and organizes it in a consistent format, which helps prevent oversights.
- Spend less time setting up the document: Use the draft as your starting point, then check measurements, review fit and agree on the final details with your factory.
- Standardization: A uniform layout for all your spec sheets eliminates confusion and keeps everyone aligned. This is especially helpful if you’re juggling multiple collections or working with several manufacturing partners.
- Improved Collaboration: Because the final doc is easy to share digitally, manufacturers, pattern makers, and quality assurance teams all have access to the same, up-to-date details. Less miscommunication means fewer production delays.
Get your first tech pack FREE!
You may also like: Tech Packs in Clothing: A Complete Guide