
1. Prepare a clear garment photo
Choose a front photo that shows the whole garment, including its edges and hem. Good lighting and a plain background make details easier to see. Lay the garment as evenly as practical, and avoid covering pockets, closures, or seams with hands or other objects. If a detail is important but hard to see, keep a close-up or your design notes nearby for review.
The example below shows the front of a pair of pants. You can see the waistband, fly, angled pocket openings, horizontal knee seams, and hems. The dark fabric and folds also show why a reviewer needs to look closely at the original when checking the drawing.
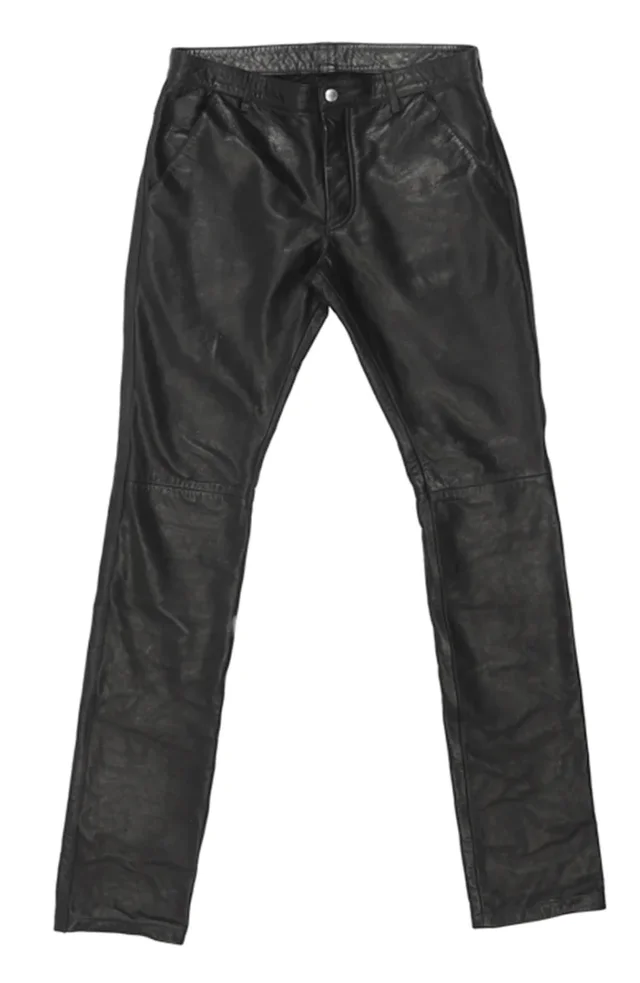
If you have a clear back photo of the same garment, keep it ready too. The front photo is required in the AI Tech Packs flat sketch generator; the back photo is optional. A back reference helps you review back details instead of guessing from the front. If you don’t have one, note the missing information and confirm it before relying on a back drawing.
2. Generate the flat
Open the generator and add your front photo. Add the back photo if you have one, then generate the sketch. Once the result is available, compare it with the reference before downloading or using it in your documentation.
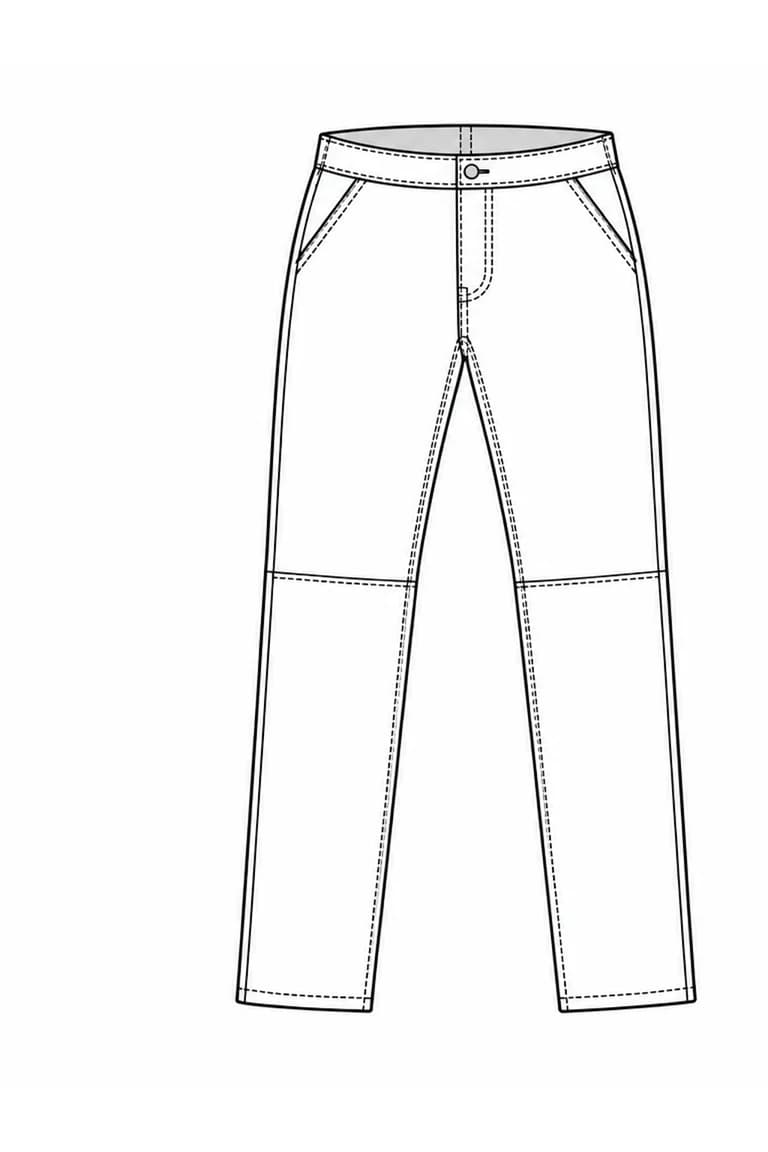
The generated flat gives the pants a clean outline and makes several construction lines easier to inspect. It shows the waistband and fly, angled pocket lines, knee seams, and hem stitching. That visibility is useful, but it is not proof that every line matches the garment or the intended specification. Keep the photo and any approved design notes beside the sketch as you review.
3. Review construction details against the reference
Work from the overall shape toward the small details. First compare the silhouette and proportions: the waistband, rise, leg shape, and hem. Then move through the features that explain how the garment is constructed.
For the example pants, review these areas:
- Waistband and fly: Compare the waistband shape, closure position, and fly line with the photo and your design notes.
- Pocket openings: Check the angle and placement of each visible opening. Confirm any construction that is obscured by folds or dark fabric.
- Knee seams: Look at where the horizontal panel seams meet the side and inner leg lines. Check the dashed stitch lines in the drawing against the reference or a closer view.
- Hems and inseams: Follow each line to the bottom of the leg and check the hem stitching and leg outline.
The interactive pants example lets you compare the photo and flat and inspect those areas in the SVG. If a generated detail is unclear, missing, or inconsistent with your garment, mark it for correction. Regenerate or refine the result if needed, and use a better reference or garment notes to resolve details the photo does not show.
Do not use the apparent size of a feature in a photo as a production measurement. Perspective, garment positioning, and camera distance can change how it looks. Use verified measurements and specifications for the actual style.
4. Download the format you need
Download a PNG when you need an image of the flat as a visual reference. If SVG export is available for your garment and you want to revise the drawing, choose the line vector SVG. An SVG contains vector linework that you can open and edit in software such as Adobe Illustrator. Review the exported file as well as the generated preview: the details that matter to your style still need a designer’s judgment.
You can inspect the pants sample SVG from this example. It is the generated output before manual editing. SVG export is a beta, and the structure and usefulness of the linework can vary by garment; check the file you receive. For more on the distinction between raster and editable vector artwork, read how the flat-sketch PNG-to-SVG workflow works.

5. Edit the original vector linework in Illustrator
Open the downloaded line vector SVG in Illustrator and keep the original download as your reference. Inspect the objects and paths around the details you marked. Select the relevant linework and adjust it to match your garment and approved notes—for example, refine a pocket line or correct the position of a knee seam if your review identifies a mismatch.
Check the drawing at both full view and close range. At full view, look for proportions and balance; close up, follow seams, stitching, and closures to see whether lines connect and read clearly. Save your working file and review the changes against the original reference.
If you are preparing an Illustrator file for the next stage, the Illustrator-to-tech-pack guide covers how to organize and review the drawing, artwork, and production notes before upload.
6. Continue to a reviewed tech pack
When the drawing reflects the intended design, add it as a visual reference in your tech pack. Include the other information your team and manufacturer need: verified measurements, materials and trims, construction notes, and any relevant artwork or color details. If a back view is needed, review it against a back reference and resolve any gaps in the documentation.
Finally, compare the drawing with the written specifications. A line on the flat and a construction note should describe the same intended garment. Have the responsible designer or technical designer review the complete pack before sharing it with a manufacturer. The flat helps communicate the design; the reviewed measurements and instructions give that drawing its production context.